
Is your raw converter missing a lens correction profile for your lens? Is your raw converter also relying on Lensfun? Then don’t worry. Lensfun is the most popular lens correction library for raw converters to use and a good thing with Lensfun is that you can, and should, contribute yourself to create your own correction profiles. Lensfun is used in both free and paid software so for some people it may feel strange to first pay and then still need to contribute.
”If I’m going to pay for software, it shouldn’t be relying on the community and open source for updates to a critical function.”
Well, Capture One is creating its own lens profiles and it is tragic to look at the lens correction request page (Archive.org). At the moment for this article Capture One has one lens correction profile for EF-M mount.
”This is getting ridiculous. The new update comes out today – and one RF lens profile added. One. The lack of support for Canon RF lenses is abysmal, and several of these lenses are designed with software corrections in mind, which basically means that I can’t use C1 for these files. At all. There are lenses that have been out for well over a year now that do not have profile support.”
For Lightroom users it took around one year to get lens correction for a popular lens like Canon RF 70-200/4L IS USM.
Back to Lensfun. For prime lenses it may take just a few minutes before you are ready to go. For zoom lenses you will need to redo the calibration for at least five focal lengths. Even more if you strive for perfection. You will find a complete tutorial here from Andreas Schneider.
Distortion correction
Choose something with a straight line at the top of your image and one third down in the image. The target should be at least eight meter away so the correction will be accurate for architectural. You will need to load the image in Hugin and then follow the tutorials below.
- Method 1
- Method 2
TCA correction
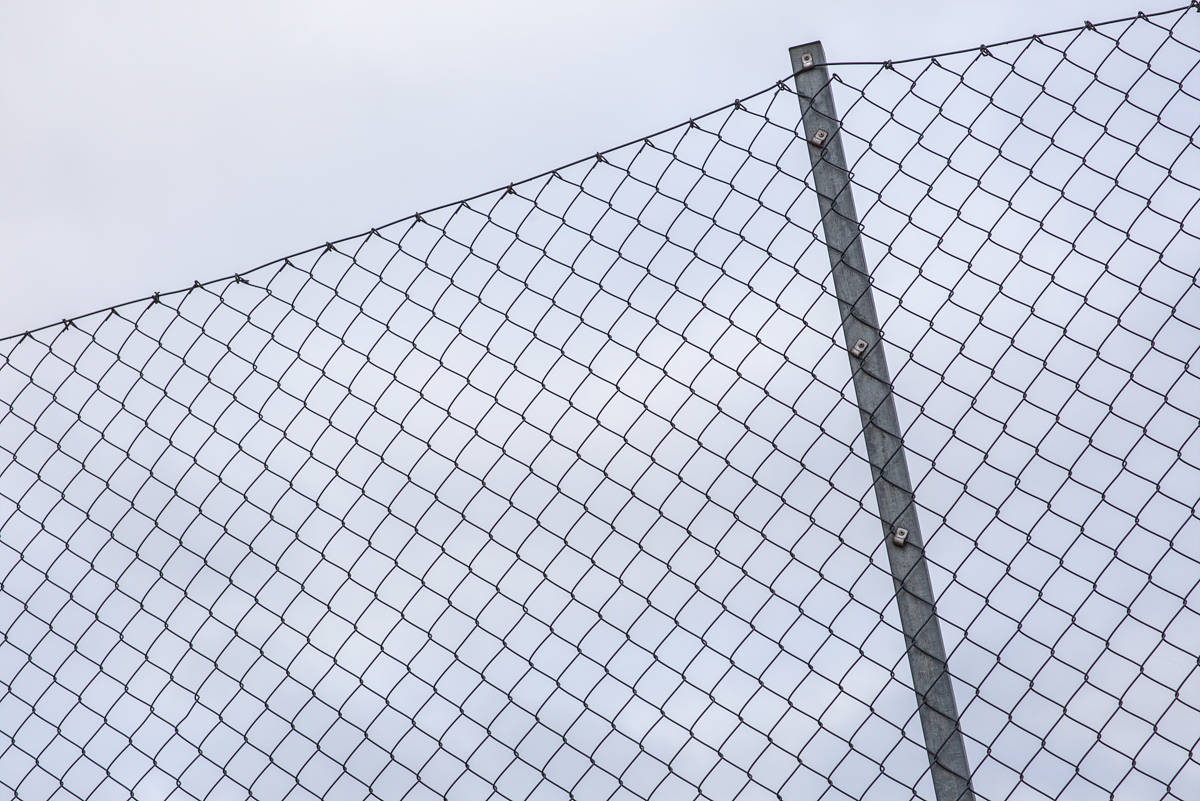
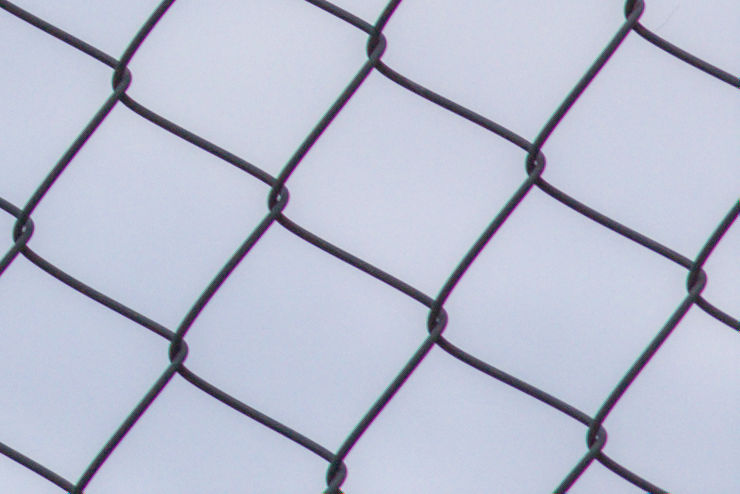
Choose a target with neutral colours and use f/8. A grey metal fence with white background like a cloudy sky works. Make sure you don’t clip the highlights in the raw file. Else you may introduce false colours that may fool the TCA correction script. PanoTools has more information about TCA.
Vignetting correction
For this you will need a diffuser. A piece of milky acryl glass is cheap, around €7, and works good. Search at Ebay.
The fast way to get samples is to focus to infinity (focus on real things far away like clouds. Else your lens profile may overcorrect sky pictures) and take the pictures at the widest aperture and three more with 1 Ev between. A fifth sample should be the most closed aperture like f/22. Total five pictures. For Canon EF 50/1.4 USM it will be f/1.4, f/2 f/2.8, f/4 and f/22.
The slow but better way is to take as many samples as you can and at different focus distances. Canon EF 50/1.4 USM doesn’t register any focus distance at all (it will always be infinity in Exif) so for this example I will use Canon EF 85/1.4 L IS USM instead. Its focus distance goes from 0,83 m to infinity. From the article written by Andreas Schnider he recommended four distances.
”The first focus on the near point (The near point is the closest distance that can be brought in focus). The next focal distances are the near point multiplied by 2 and by 6 and finally focus at infinity.”
I would like to add one more distance and that should be the reported focus distance just before infinity. With Canon lenses infinity reported in Exif can be pretty wide, so that is my reason to have one more distance just before it.
How I would take vignetting samples for Canon EF 85/1.4 L IS USM:
- 85 mm and 0,83 m: f/1.4-f/16 and then a last one at the smallest aperture, f/22.
- 85 mm and 1,66 m: f/1.4-f/16 and then a last one at the smallest aperture, f/22.
- 85 mm and 4,98 m: f/1.4-f/16 and then a last one at the smallest aperture, f/22.
- 85 mm and 38 m: f/1.4-f/16 and then a last one at the smallest aperture, f/22
- 85 mm and infinity: f/1.4-f/16 and then a last one at the smallest aperture, f/22
Generate the correction data
The script to use is possible to find here.
Not a Linux user or not having the knowledge to install all dependencies? Then use a VirtualBox instead that works with Linux/Windows/OS X. Install VirtualBox and import my ova file with all dependencies installed. The password for the ova installation is abc123 if you ever will need to install something new on it.
You will find the calibration script in the folder Home/Downloads/lens_calibrate-master
When you have navigated to the folder lens_calibrate-master, right click and open a Terminal there, but don’t do anything else with the Terminal yet.
Put one raw file in the folder distortion and now in the Terminal you already opened, write and hit enter:
./lens_calibrate.py distortion
This will create a new file named lenses.conf. It will also generate a .TIF file in the distortion folder you may use for distortion correction, see the YouTube video above about distortion.
If you open lenses.conf you will probably have the right lens name there but not the right maker or mount. Insert your lens maker and camera mount here. You will be able to edit it later if you write something wrong.
Next step is to put all your TCA sample files in the folder tca. One sample for a prime lens and at least five samples at different focal lengths for a zoom lens. I took a raw sample for every fifth focal length for my Canon EF 24-105/4L IS USM.
In the Terminal you already opened, write and hit enter:
./lens_calibrate --complex-tca tca
Last folder is vignetting. If you only did the fast method and used a prime lens, create a subfolder named inf.
Put your raw sample in the right folders and in the Terminal you already opened, write and hit enter:
./lens_calibrate --vignetting
Now the last part is to merge them all into an xml file.
./lens_calibrate --generate_xml
Open lensfun.xml and copy paste the new generated data into your xml file in your lensfun folder.
How Lensfun database is organized
Lenses and cameras are in xml files in the database. The main categories are compact cameras, SLR cameras and mirrorless cameras. Below is a sample from slr-canon.xml.
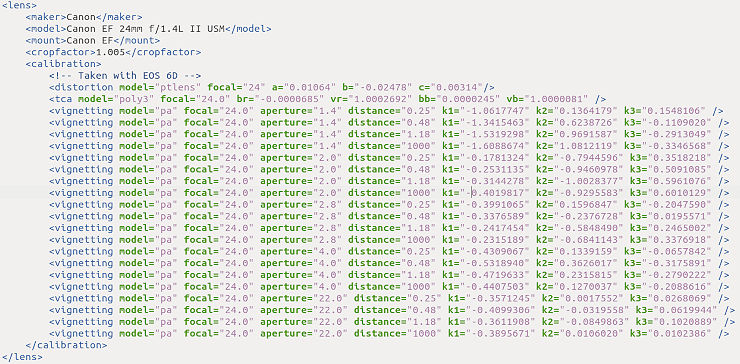
- the maker is Canon
- the lens model is Canon EF 24mm f/1.4L II USM
- the mount is Canon EF
- the cropfactor is 1.005 from Canon EOS 6D. 35.8 x 23.9 mm instead of 36 x 24 mm that 5D III has.
- <!– Taken with Canon 6D –> is just a notice and Lensfun will not read what is written here. You can write whatever you want.
After that you have the correction data. For a prime lens you will only see one focal length at distortion and tca. The amount of vignetting correction data depends on how many different samples you took. With a prime lens and only focus distance set to infinity it may be as few as five samples.
Where to find your local Lensfun database
Lensfun is used by RawTherapee, ART (AnotherRawTherapee), darktable, DigiKam, Topaz Studio, Photomatix, ON1, ACDSee, easyHDR, SILKYPIX, AfterShot Pro, Exposure Software, rawproc, GIMP and Affinity Photo. It means that the database may be in a different place depending on the software you use. What I have found this far:
Linux
- /usr/share/lensfun/version_1 or /var/lib/lensfun-updates/version_1 or /.local/share/lensfun
Windows
- ART | C:\Program Files\ART\1.x\share\lensfun
- darktable | C:\Program Files\darktable\share\lensfun\version_1
- digiKam | C:\Program Files\digiKam\data\lensfun\version_2
- ON1 | C:\Users\User-name\AppData\Roaming\ON1\ON1 Photo RAW 202x\lensdb
- Exposure Software | C:\ProgramData\Exposure Software\ExposureX7\LensProfiles.db
OS X
- ON1 | ~/Library/Application Support/ON1/ON1 Photo RAW 202x/lensdb
Updated Canon profiles to download
If you are missing a profile for your lens and can’t find it at the Lensfun project, not even in the issues or pull requests, try my inofficial versions below. Upzip, look for your lens and if you find it, take a backup of your file before replacing it with my xml file. If your raw converter doesn’t find the right lens you may need to add Canon in front of the model name, for example Canon RF24-240mm F4-6.3 IS USM.
Included supported lenses and cameras in my versions (gathered from issues and pull requests + my own lens profiles)
MIL-CANON.XML:
M50 II
M6 II
R3

RF 85/2 MACRO IS STM
RF 24-240/4-6.3 IS USM
RF 50/1.8 STM
RF 14-35/4L IS USM
RF 15-35/2.8L IS USM
RF 100/2.8L MACRO IS USM
RF 100-500/4.5-7.1L IS USM
RF 16/2.8 STM
RF 24-105mm F4-7.1 IS STM

SLR-CANON.XML:
1D C
1D X III
EF 22-55mm f/4-5.6 USM
EF 24/1.4L II USM
EF 28-135mm f/3.5-5.6 IS USM
EF 35-105mm f/3.5-4.5
EF 50/1.0L USM (test version. Decent raw files needed)
EF 50/1.2L USM
EF 70-210/4
EF 75-300/4-5.6 III
EF 100-200/4.5A
EF 300/2.8L IS USM
EF 500/4L IS USM
EF 800/5.6L IS USM (no distortion correction)
EF 800/5.6L IS USM +1.4x III (no distortion correction)
EF 800/5.6L IS USM +2x III (no distortion correction)

SLR-SIGMA.XML:
Sigma 500/4.5 APO EX DG HSM